I love making name frames for new babies. I think it makes such a fun and special gift. For this frame I used VersaMagic chalk ink in rainbow colors and the monogram stamps from A Muse. The frame was $3 at WalMart. The clear stamps and clean design made this a much faster project than some of the other frames I've done.
Showing posts with label Gifts. Show all posts
Showing posts with label Gifts. Show all posts
Sunday, January 04, 2009
Emily frame
I love making name frames for new babies. I think it makes such a fun and special gift. For this frame I used VersaMagic chalk ink in rainbow colors and the monogram stamps from A Muse. The frame was $3 at WalMart. The clear stamps and clean design made this a much faster project than some of the other frames I've done.

Saturday, January 03, 2009
More baby shoes
 For some Christmas gifts and my church's holiday craft fair, I made some more baby shoes. For these two pairs, I used metallic and pearl fabric paint from Tulip so they were sparkly and festive. The ornament is from the Heart warmers set by
Kim Hughes at Cornish Heritage Farms.
 I absolutely loved this rainbow pair too. Aren't they fun and girly without having to be pink? he rainbow is from the Little Gal set by
Kim Hughes at Cornish Heritage Farms.

The last two pairs weren't stamped at all. I just loved the print on this corduroy from Joann's, so I just had to use it.
That's all I had time to finish before Christmas. I did cut out, stamp and paint several more pairs, so you haven't seen the last of these yet.
For details on how I made these, see my previous post on the subject.
Monday, November 24, 2008
Photo Shoot
 So this weekend, I decided to try and take some pictures of the kid in his new shoes. This proved to be more difficult than I expected. Now that he's "crawling" (more like army crawling), he hardly ever sits still.


The last picture is my favorite! I was kneeling on the floor to take his picture and he decided to crawl up my lap to see what I was doing.
 I just love him to pieces!
Thursday, November 20, 2008
Baby Shoes!
 Okay, I am really excited about this project! Soft-soled shoes are all the rage for babies these days. There's lots of brands on the market and they range from $20-$30 each. This pair cost me about $4. I used an old pair of jeans that no longer fit, a fat quarter of flannel for the lining and some Toughtek® for the soles. The pattern is free on Tacky Living.
The fun part about making your own baby shoes (besides the cost savings) is that you can decorate them however you chose! I just love this little snowman from Kim Hughes' Heartwarmers set on Cornish Heritage Farms. Before assembling the shoes, I stamped the snowman on the denim vamps in Palette Noir ink. Once it dried, I painted it in with Tulip soft fabric paints. It took two coats of paint for the white to be opaque. Then once it was dry, I backstitched the outline of the snowman with some embroidery floss.
I absolutely love these and can't wait to try them on my little guy on the morning! Now I can't wait to make another pair.
Sunday, August 17, 2008
Seven Months!
 I can't believe another month has passed. My little guy turned 7 months old last Friday, so it was time to pull out another onesie and get some pictures. What a difference a month makes! Last month, he was barely able to sit up and needed one of us to help him stabilize. Not anymore!
If you'd like more information on how I made this onesie, see the six month post here.
I'm planning to stamp tonight, so check back tomorrow for some cards. :)

Sunday, July 20, 2008
Six months
 Last week, I mentioned that I made a gift for my husband's new cousin. I also made these for my little guy.
About a month ago, I stumbled upon this etsy shop and fell in love with their grow baby grow onesies. The idea is to take the baby's picture every month on their birthday and then after a year, you can see how much they have grown and changed. Brilliant! The only problem I had with this product is that they use Gerber onesies and chose the size for each month based on the manufacturer's sizing guidelines. Gerber onesies run small to begin with and my guy just switched into size 12 month clothes from Carter's (even though he is only 6 months old)! Gerber onesies also stretch out of shape pretty easily. They are made out of an underwear-type material.
So, I decided to make my own using Carter's onesies and Avery ink jet iron-ons. They are my favorite brand. :) I just got Photoshop Elements for my computer and thought this would be the perfect project to get started with. Plus, this way I could control the sizing of the onesies. I made 1-6 month onesies for the new baby and a 6 month onesie for my little guy. I'm planning to make the rest of his as he grows and I'll make the 7-12 month size for my husband's cousin when we see how big she is at 6 months.
By the way, this is a blatant CASE of the etsy onesies. When I stumbled upon the free Fortuna Dot font, I decided to just copy the design exactly. Once I get more comfortable with Photoshop, I'll try designing my own graphics.
Saturday, July 12, 2008
Big Sister
 As I mentioned earlier this week, my husband has a new little cousin. And that new cousin has a four and a half year-old big sister. When we went to visit the baby, we just had to bring a gift for her big sister too. :)
So I decided to make her a shirt with Dress-up Lilly from Pink Cat Studios. Back in high school, I used to paint shirts for my little cousins all the time. I would trace their favorite cartoon character out of a coloring book onto tracing paper with an iron-on pencil and then iron the image onto a shirt. Then I would use Tulip soft paints to color it in. During my last trip to Michaels, I was surprised to see that Tulip still sells these paints. So, I purchased a few colors and took a trip down my crafting memory lane.
The first step to stamping on fabric is to pre-wash the shirt without any fabric softener. Also, don't use a dryer sheet or else the ink and paint won't set fully. Then make sure to stick a piece of cardboard inside the shirt so your paint/ink doesn't bleed through to the back.
After the prep work was done, I stamped Lily using Palette Noir black ink directly onto the shirt. The "big sister" was stamped with VersaMagic craft ink. On an old t-shirt I tried using the Tulip paint directly on the acrylic stamps, but it did not coat very well and ended up stamping poorly.
 After letting the ink dry for an hour, I colored Lily in using the Tulip Soft paint. I ended up mixing white with the peach color to lighten it for her skin. Then to add some sparkle, I colored her dress in with the Amethyst pearl paint. It has a lot of sparkle in person, although it is hard to see in the pictures. You can see all the colors of fabric paint on Tulip's website.
When that was dry, I went over Lily's outline with a black fabric marker to give her some more definition.
This was a fun project and I definitely see some more painted T-shirts in my future!
Stamps: Dress Up Lily from Pink Cat Studios, Large & Small polka dot alphabet from A Muse
Ink: Palette Noir Black, Tulip soft fabric paints
Wednesday, January 09, 2008
Christmas Wrap-up
 This was not a very creative Christmas at the Summerer house. To be honest, we've been a little preoccupied with baby preparations, so Christmas was almost something we just had to get through. As a result, we did give away a fair number of gift cards. To make that a little more appealing, I ordered these cute gift card tins from Gina K Designs and decorated them with retired Christmas paper from Stampin' Up! I wrapped some taffeta ribbon around the tin's lid just like Gina so they could be reused. The tags are tied on with silver cord. I inked each tag up with my markers so I could color coordinate it with the tin. Pretty simple stuff. This tag was from the level one hostess set Party Punch that retired in the 2006-2007 catalog.
 For the neighbors, I made my own hot cocoa mix and gave it out in the tea tins that Gina carries. This idea originally came from Nichole Heady. I used the same recipe as Nichole, except I added a little bit of cinnamon (maybe 1 teaspoon). I find that where you buy your spices can make or break a recipe like this. My dutch processed cocoa and cinnamon (Extra Fancy Vietnamese) comes from Penzey's Spices. They have the best stuff! It's pricey, but I especially love their vanilla extract.
Anyway, to decorate the tin, I used the retired Like it a Latte set from Stampin' Up! and Holiday Treats from PaperTrey Inc.
One last hot cocoa tip! Every night I have a cup of diabetic hot cocoa. I tried the sugar free stuff from the grocery store, but it was flat and not very chocolatey. So, I came up with this instead: 1 cup of milk, 2 packets of splenda and 2 tablespoons of dutch processed cocoa. Yummy and only 15g of carbs. The perfect chocolately snack for a gestational diabetic! Plus the calcium is good for the baby. ;)
Thursday, October 25, 2007
Ornament Challenge
 I signed up for the weekly challenge on my yahoo group again this week. The challenge was to make ornaments. I was planning to make these again because I love to color and they are so much fun! But, when we got our assignments I was given my friend Lisa Somerville and I already gave her one of those ornaments at convention. So, this was going to be a real challenge!
I went to Michaels looking for some glass ornaments and didn't find anything I liked. But I did see some cute porcelain ornaments. They are glazed, so I couldn't color on them. So, I decided to try embossing and see what it looked like. The verdict? I think they look very elegant! Perfect!!
Stamps: Holy Triptych
Ink: VersaMark
Accessories: Gold Embossing Powder, Vanilla Taffeta Ribbon, Gold Cord
Tools: Heat Tool, Powder Pal
Friday, October 12, 2007
Blogger's Challenge Friday #16
This week's challenge was to make an ornament. I loved making these ornaments for convention so much, that I figured I'd have another go with the Ranger Memory Frames. So the only decision left was what to stamp?
When we got married, one of my favorite wedding gifts was a set of twelve ornaments that Eric's aunt & uncle had collected for us. Tucked away with the ornaments was a sheet of paper explaining their significance. Here's what it said:
 When my best friend from college got married this June, we gave her a set of ornaments that we had been collecting for a couple of years. I wanted the ornaments to be all different styles. But, a few of the twelve were very difficult to find and we had to settle on whatever we came across. Two of these hard finds were the fruit basket and the flower basket.
So, wouldn't it be great to be able to stamp these ornaments instead? Then they would be perfect -- just what I envisioned. That was the inspiration for my blogger's challenge entry this week.
I hope you enjoyed my entry this week. Don't forget to check out the other blogger's challenge entries! You can find links to all of their sites in my sidebar.
Stamps: Basket Full of Fun
Ink: Palette Noir Black Ink
Paper: Watercolor Paper
Accessories: Red Gingham Ribbon, Ranger Inkssentials Memory Frames, Ranger Inkssentials Memory Glass
Tools: Watercolor Wonder Crayons, Aquapainter
When we got married, one of my favorite wedding gifts was a set of twelve ornaments that Eric's aunt & uncle had collected for us. Tucked away with the ornaments was a sheet of paper explaining their significance. Here's what it said:
According to the old German tradition, the tree of a newlywed couple should include these twelve ornaments to ensure blessing and happiness for their life together.
An Angel - God's Guidance in the Home
A Rose - Beauty and Affection
A Rabbit - Hope and Faith
A Teapot - Hospitality
A Pine Cone - Motherhood and Fruitfulness
A Santa - Unselfishness and Goodwill
A House - Shelter and Protection
A Fruit Basket - Generosity
A Bird - Happiness and Joy
A Flower Basket - Good Wishes
A Heart - True Love
A Fish - Christ's Blessing
 When my best friend from college got married this June, we gave her a set of ornaments that we had been collecting for a couple of years. I wanted the ornaments to be all different styles. But, a few of the twelve were very difficult to find and we had to settle on whatever we came across. Two of these hard finds were the fruit basket and the flower basket.
So, wouldn't it be great to be able to stamp these ornaments instead? Then they would be perfect -- just what I envisioned. That was the inspiration for my blogger's challenge entry this week.
I hope you enjoyed my entry this week. Don't forget to check out the other blogger's challenge entries! You can find links to all of their sites in my sidebar.
Stamps: Basket Full of Fun
Ink: Palette Noir Black Ink
Paper: Watercolor Paper
Accessories: Red Gingham Ribbon, Ranger Inkssentials Memory Frames, Ranger Inkssentials Memory Glass
Tools: Watercolor Wonder Crayons, Aquapainter
Friday, August 10, 2007
Blogger's Challenge Friday #7
 This week's blogger's challenge is called "Alter It". Basically, we could alter anything from a frame to a tin. I chose to alter an On Board Art Journal from Stampin' Up! This also just happens to be the Ways to Use it (125) challenge this week on splitcoast. It's nice how that worked out. ;)
 I had purchased this journal back in May to record my thoughts and feelings about my pregnancy, but I put off decorating it in case something went wrong. Now that I'm 4 months along, I should stop thinking that way. So this challenge is well timed.
On the drive up to the SSUS Cape Cod retreat in March, Barb & I stopped at the Scrapbook Clubhouse in Westbrook, CT. That's where I bought two sheets of the Stork paper from the Karen Foster Maternity line. It was just too pretty to pass up and it is the perfect paper to cover my pregnancy journal!
I took the two covers off the journal in order to cover them book-style like Carol Duvall always did on her show. I used Royal Coat Decoupage Finish to adhere the paper to the book. I've also heard that you can use Stampin' Up! glue sticks for this. If you'd like me to share some details & measurements, let me know!
I made a tag for the journal using one of the big circle tags from the On Board Accents chipboard. I colored the tag with Very Vanilla craft ink and dried it. Then using my Palette Noir black ink pad, I stamped the my from the retired Stampin' Up! set Phrase Starters. I stamped the 2" x 1" pregabella from Stamping Bella on some watercolor paper and then cut her out and glued her on the tag. I wasn't sure how well I'd be able to watercolor directly on the tag. (Did you know that some of the bellas come in two different sizes?) Anyway, then I stamped the word journal down the side of the tag with the also retired Stampin' Up! set Euphoria Alphabet & Numbers.
I was worried that pregabella might come off, so I smooshed my Versamark pad all over the tag and embossed with Glassy Glaze (UTEE). I did this 3 times to get it nice and smooth. Now I'm not sure if I like the shiny look of it next to the vintagey paper. I might redo that part later.
A little twill tape finishes it off nicely. Now I just need to start using it before the baby comes!
I hope you liked my entry today! Don't forget to check out the other Blogger's challenge entries! You can find links to all of their sites in my sidebar.
Stamps: pregabella from Stamping Bella, Phrase Starters II, Euphoria Mini Alphabet & Numbers
Ink: Palette Noir Black, Very Vanilla Craft Ink, Versamark
Paper: Stork by Karen Foster, watercolor paper
Accessories: Twill Tape, Pop-up glue dots
Tools: Watercolor Wonder Crayons, Aquapainter, 1/4" square punch, Royal Coat Decoupage Finish, Sponge
Friday, July 20, 2007
Christmas Ornaments
 I know, I know. Enough with the Christmas stamps already! It is a bit early for all this Christmas stamping. I promise once the Stampin' Up! convention is over, I'll put all the Christmas stamps away for a few months.
These ornaments are my 3-d swap for the SSUS convention group swap. Actually, just the snowman one is the swap and I made 18 of them! The others are for a special friend. (I don't want to ruin the surprise!)
Anyway, these turned out even better than I had hoped when I saw the Jolliest Time of the Year stamp set in the new Fall & Winter Collection. Even though I have tons of Christmas sets, I don't have a lot of good Santa images and this guy was just perfect! I love the look of wonder in his eyes as he dances around in the snow.
The ornaments come in a 3-pack from Ranger. They are called Inkssentials Memory Frames and come in polished chrome, antique copper and black patina finishes. I used the polished chrome in the 2 x 2 inch size. They also come in 1.5 x 1.5 inches and 1 x 3 inches! The frames do not have any glass in them, so you'll also need to pick up some Inkssentials Memory Glass from Ranger. They come in the same sizes as the frames and you can choose between clear and frosted glass. I used clear glass on mine, but I want to order the frosted now to see how that would look. You can buy all of this from skybluepink.com. They have great prices & fast shipping. I've ordered bracelet blanks and mini dominoes from them in the past as well.
So, for each ornament you will need 1 memory frame and 2 pieces of memory glass. The frames don't have a back, so your ornament will be two-sided.
I stamped the snowman, Santa and tree images with jet Black Stazon ink on 2" x 2" pieces of watercolor paper. (I actually stamped the front & back with the same image.) Then I colored in both sides with my watercolor wonder crayons and an aquapainter. The great thing about watercolor paper is that it is thick enough to stamp & watercolor on both sides without anything bleeding through. On the outside edges of the snowman, I applied a little bordering blue color to make the snowman look even whiter. This is a trick I learned from Julie Ebersole.
Once the paper was completely dry, I made a sandwich by sticking the watercolor paper between 2 pieces of memory glass and then inserted it into the frame. The manufacturer recommends that you don't open and close the frame more than once. The hinges aren't really designed for repeat use.
To finish it all off, I tied a 12 inch piece of bashful blue taffeta ribbon on as the hanger. I love the new taffeta ribbon so much! It is super lush! I plan to add the rest of the colors to my next order. ;)
I think these ornaments would make great gifts! Besides stamps, you could put pictures of your kids inside or their own tiny artwork. Maybe a wedding picture for newlyweds. I think the possibilities are endless!
Stamps: Jolliest Time of the Year
Ink: Stazon Jet Black
Card stock: Watercolor Paper
Accessories: Bashful Blue Taffeta Ribbon, Ranger Inkssentials Memory Frames, Ranger Inkssentials Memory Glass
Thursday, May 24, 2007
Bridal Shower Favors
 As promised, here are the party favors from my friend Adrienne's bridal shower. Adrienne has always been into gardening, so when I saw this idea during a google search for bridal shower favors, I thought, "I can make that!" And if I do say so myself, mine came out better!
I used small Terracotta pots from Home Depot that cost about 54 cents each. Then my husband spray painted the outsides of them white for me. I then painted the rims a celery green color with a foam brush and some acrylic paint from Michaels. After another google search for painting pots, I found this site which recommended sealing the inside of the pots with polyurethane. So, my husband did 3 coats for me with a water-based polyurethane I picked up at Michaels. As a final touch, he gave the outsides a spray with Patricia Nimrock's Matte Sealant to make them easier to keep clean. This process took a couple of days, but it was totally worth it. The pots are super cute and more durable than the little plastic ones that my inspiration included.
Once the pots were completely dry, I tied a ribbon around each one. This ribbon is Martha Stewart's brick-coffee bean piped ribbon that is now available at Michaels. I used exactly 1 roll for the 12 pots that I made. I was going to use Stampin' Up's wine narrow organdy ribbon, but I didn't have enough on hand and I cut this project a little close to the deadline. ;)
The seed packets were made with whisper white card stock. I made a template in Word that had all the text on it (the back of the packet has planting instructions). Then I cut them out, folded them up & stamped the blooming heart from Simply Said on the front. Isn't it just perfect for the "love is blooming" sentiment? I colored it in with Ruby Red, Pumpkin Pie & Certainly Celery markers.
I slipped a mini-ziplock bag in each packet filled with Love in a Mist seeds that I ordered from cheapseeds.com.
I promise to post a tutorial on the seed packets later. This post is certainly long enough!
I'll leave you with a picture from the shower showing the pots in their natural habitat. In the background you can see the plate full of yummy Italian Almond Cookies that were made by the mother of the bride.

Stamps: Simply Said
Ink: Palette Noir Black Ink, Ruby Red, Pumpkin Pie & Certainly Celery Markers
Card stock: Whisper White
Tools: Sticky Strip, Bone Folder, Paper Cutter
Monday, March 26, 2007
Receipts Box
Wow! I just got home from a fabulous 4-day weekend spent stamping with 18 of my closest friends. :) We swapped, ate, shoebox swapped, ate, stamped, ate, laughed, ate -- you get the picture!
I shared most of my swaps for this trip last week, but I saved my 3-d swap for last. Here's the before picture:

And the after picture:

I got this idea from my fellow Connecticut stamper, Cathy. The little boxes were $1 each at target in the office supply section. I adhered the designer paper to the boxes with Royal Coat Decoupage Finish. It's like Mod Podge. I thought it would be cute to keep in my car or purse to organize business receipts until I had a chance to file them at home. The word Receipts was printed in the SU Harry Paul font from one of the font cds. Then I used the two oval punches to punch out the word and its layer. I finished them off with a little ribbon, just like Cathy did.
For the inside, I used the new Stampin' Up! rounded tab punch from the Spring Mini Catalog to cover the original tabs and make things a little more colorful.
I'll try to put a tutorial together with all the measurements this week. Be a little patient with me though! I'm really tired from my crazy stamping weekend and I have a pile of laundry to get through!
Here's a bunch of close-ups. Click on the pictures to see a larger view.


I shared most of my swaps for this trip last week, but I saved my 3-d swap for last. Here's the before picture:

And the after picture:

I got this idea from my fellow Connecticut stamper, Cathy. The little boxes were $1 each at target in the office supply section. I adhered the designer paper to the boxes with Royal Coat Decoupage Finish. It's like Mod Podge. I thought it would be cute to keep in my car or purse to organize business receipts until I had a chance to file them at home. The word Receipts was printed in the SU Harry Paul font from one of the font cds. Then I used the two oval punches to punch out the word and its layer. I finished them off with a little ribbon, just like Cathy did.
For the inside, I used the new Stampin' Up! rounded tab punch from the Spring Mini Catalog to cover the original tabs and make things a little more colorful.
I'll try to put a tutorial together with all the measurements this week. Be a little patient with me though! I'm really tired from my crazy stamping weekend and I have a pile of laundry to get through!
Here's a bunch of close-ups. Click on the pictures to see a larger view.


Wednesday, December 20, 2006
Movie Night

It is so hard to buy presents for grandparents. They usually have everything they need already and might even be downsizing. So this year, we are teaming up with my husband's siblings to give his grandparents a movie night.
I got the tub of microwave popcorn from Blockbuster along with a $10 gift card (enough for 2 movies). Then we picked up some boxed candy at Wal-Mart to round out the offering. I think it came together pretty well.
For the actual movie night, we're planning to have the grandchildren act as ushers and we'll rent some classic movies like Breakfast at Tiffany's or something. I'm not really sure about that part because I was just in charge of the invitation. I had grand plans for this card, but in the end I ran out of time so I did a simplified CASE of Mary Brown's super cute card.
I used the ticket corner punch to make the sentiment resemble a movie ticket.
Stamps: Treat Yourself, Sincere Salutations
Ink: Basic Black, Yoyo Yellow Marker, Real Red Marker
Card stock: Whisper White, Tempting Turquoise, Real Red, Brilliant Blue
Accessories: Ticket Corner Punch, Aquapainter
Happy Holidays to all of you! This will probably be my last post before the new year.
Wednesday, December 13, 2006
Sporty Frame
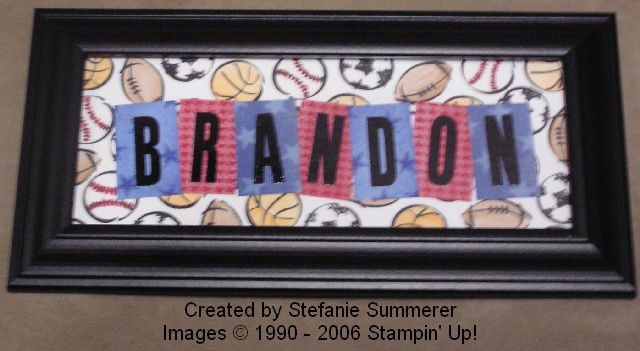 In November, my younger cousin and his girlfriend had a baby. He's 4 years younger than me, so his being a father is a little weird. Anyway, he's always been a big sports fan and the baby's nursery is all decked out with Patriots and Red Sox gear. So, obviously his name frame needed to be a little over the top. I think this fits the bill nicely.
I stamped the baseball, basketball, football and soccer ball from the Good Sport stamp set all over a piece of whisper white card stock to make my own sporty patterned paper. Once again, I used craft ink for everything so that it won't fade over time. To color in the balls, I used an aquapainter and my Watercolor Wonder crayons. I had to use a really light touch with the aquapainter to keep the white card stock from pilling.
Since the background paper is pretty busy, I toned down the letters a little by only using 3 patterns. I love stamping images over the fabric textured background stamps. For this frame, I used the cute little stars from the Starstruck stamp set to tie into my sports theme.
Finally, I embossed the letters themselves in black embossing powder because I found that the white craft ink in the background was bleeding through the black craft ink. Embossing did the trick though and I think it makes the final product look pretty slick.
Stamps:
Ink: Basic Black, Whisper White, Brilliant Blue (all Craft ink)
Card stock: Whisper White,
Accessories: Basic Black Embossing Powder
Just a note, the Good Sport, Houndstooth and Just Jeans stamps are all retired. :(
Monday, December 11, 2006
Veronika
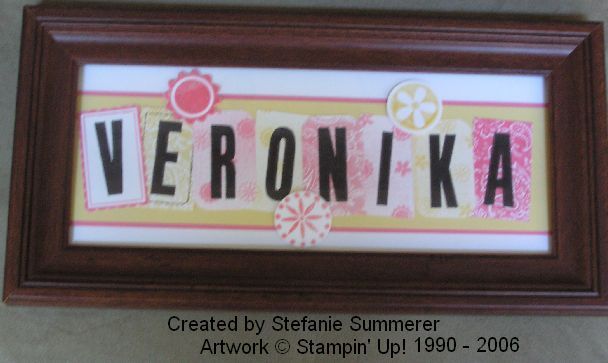
I made this frame for my co-worker's daughter. They are Russian, so the spelling of her name is a little different. That's the great thing about making name frames. Anything goes! It would probably be really hard to find something with her name on it in this country.
I just love the new Big Things stamp set from the winter mini catalog. It coordinates so well with Little Things from the Idea Book & Catalog.
The frame is from Wal-Mart. I used craft ink for everything so it won't fade over time. And for a little extra glitz, I embossed the big things with iridescent ice embossing powder. When I was all done, I thought the E was blending in a little too much, so I used the paper piercer to punch holes all around the edges and then connected them with a black Stampin' Write Journaler to make it look hand stitched.
If you're in my neck of the woods, check out my name frame class in February. I'll do all the cutting and shopping and all you have to do is stamp. The frame is included in my class fee.
Stamps:
Ink: Basic Black, Pretty in Pink, Barely Banana, Regal Rose (all Craft ink)
Cardstock: Whisper White,
Accessories: Iridescent Ice Embossing Powder, Basic Black Stampin' Write Journaler
Thursday, December 07, 2006
More Coaster Info
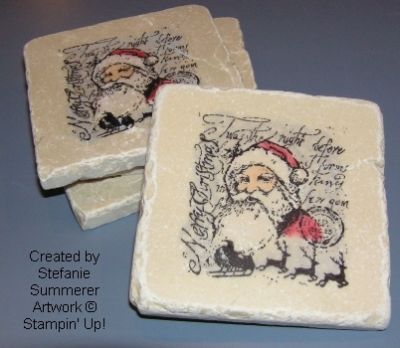 I've received lots of questions about the coasters from yesterday. So I figured I'd address them all in a new post.
I buy my tiles from Lowe's. They are tumbled tiles and come nine to a box. I know it's kind of cheating, but I go through the box in the store to make sure all nine tiles are smooth on top. I figure that the people using the tiles to actually tile a wall won't mind if they get more textured tiles. :)
When you get the tiles home, they will be covered in a chalk like dust. So, you must rinse them off and dry them completely before stamping.
Once dry, stamp away. You can either use solid image stamps with different colors of Stazon or you can you a line stamp with black or brown Stazon. For the Santa, I used Jet Black Stazon. If you aren't planning to color in your tiles, you can stop here. Just set your tiles aside for 48 hours to let the ink cure before using them. I know that some people bake their tiles to set the ink, but I think this is completely unnecessary. Why do extra work?
To color in your images, load a Q-tip up with chalk and then rub in a circular motion on the tile. It's okay if the color is a little lighter than you'd like. Once you seal the tile the color will get brighter and more vibrant.
When you're all done coloring, take the tiles outside and spray two light coats of matte sealant on the tiles. I use Patricia Nimrock Matte Sealant which can be found at Wal-Mart or Michael's. I also let the first coat dry for 15 minutes before applying the second coat.
That's it. Once the second coat dries, your tiles are ready to be used. I've been using one at work for a couple of years now and it looks as good as the day I made it.
Wednesday, December 06, 2006
Tray of Coasters

Well the open house went fairly well on Monday night. I sold a bunch of retired sets and some stuff from the catalog. I did not sell any of these though.
I made six sets of coasters using the retired Yuletide Montage stamp set. I bought this set from my upline after it retired just to make coasters with the Santa. Isn't he perfect?
The tumbled tiles are from Lowe's (I think they have better ones than Home Depot.) I stamped with StazOn, rubbed the chalk onto the tile with a Q-tip and then gave two light coats of Patricia Nimrock Clear Matte Sealant that I bought at Wal-Mart. I'm planning then glued cork to the bottom of each one to protect the furniture.
I guess I'll just pack these away to use as gifts for next Christmas.
Stamps:
Ink: Jet Black Stazon
Subscribe to:
Posts (Atom)