Lisa C. suggested that I add an email subscription to my blog so I did! Just look to the left and enter your email address. Then whenever I post something new, you'll get an email to let you know. Pretty cool, huh?
I hadn't really thought about adding an email subscription before because I use Google Reader to keep track of all of the blogs that I read. If you don't currently have a blog management system, I would recommend the Google Reader. It's free and super easy to use. Just create an account and then click on Add Subscription to add a new blog. You can even create folders to organize your blogs. For example, I have a Stamping folder, a Knitting folder and a Family folder. So now, if I want to see if anyone posted something new, I can just log into the Google Reader and see all the new posts. I don't have to stalk all of my favorite blogs anymore. Quite a time saver!
Wednesday, February 21, 2007


Tuesday, February 20, 2007
Snappy Birthday

Phew! I finished my spring mini Control Freaks swaps just under the wire this quarter. But they are now safely on their way to Nebraska where they will meet the other 42 wonderful swapper's cards before making their trip back to me in Connecticut.
The layout of this card is from sketch challenge 54. It's an oldie but a goodie. To create the sand dune, I used the rotary blade in the cutter kit. I've used the distressor tool a lot before, but this was my first experience with the rotary blade. Let me tell you, it was super easy and I had to make 42 of these. :)
To give it a little more sandy look, I used a sahara sand marker in the color spritzer tool. Once again, so easy, but I love the look.
Finally I stamped Mr. Crab on whisper white card stock with basic black classic ink. I also created a mask for him so that I could stamp the party hat and make it look like it was sitting on his head with his beady little eyes sticking out front. When it came time to color Mr. Crab in, I watercolored with Really Rust. It was just the right mix of red and orange!
Stamps: Crab & Company
Ink: Basic Black, Really Rust, Cool Caribbean, Old Olive, Sahara Sand
Card stock: Whisper White, Old Olive, Cool Caribbean, Sahara Sand, Basic Black
Accessories: Black Grosgrain Ribbon
Tools: Color Spritzer Tool, Cutter Kit, Aquapainter
Thursday, January 25, 2007
Love Ewe
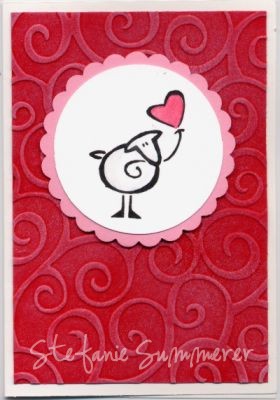 I've been really busy with workshops and classes due to Stampin' Up's Sell-a-Bration, so I haven't had as much time to stamp as I normally do. Last night after I finished prepping for another class, I decided to kick back and play with some new supplies that have made their way into my stamp room since Christmas.
This cute little sheep is the hearty ewe stamp from Stamping Bella. Ever since I started knitting, I've developed a new appreciation for sheep and this little guy was too cute! I used my Watercolor Wonder Crayons from Stampin' Up! to color him in.
The white circle was cut with my colluzle and then I used the Marvy mega scalloped circle punch for the pink circle underneath.
The background was embossed with the Divine Swirl embossing folder in my cuttlebug. Then I brushed some whisper white craft ink over the swirls to highlight them a little.
Stamps: Hearty Ewe Stamping Bella
Ink: Stazon Jet Black, Whisper White Craft Ink
Card stock: Whisper White Small Notes & Envelopes, Whisper White, Real Red, Pretty in Pink
Accessories: Stampin' Dimensionals
Tools: Watercolor Wonder Crayons, Colluzle Companion Circle template, Divine Swirl Embossing Folder, Mega Scalloped Circle Punch
Thursday, January 18, 2007
Love Bug
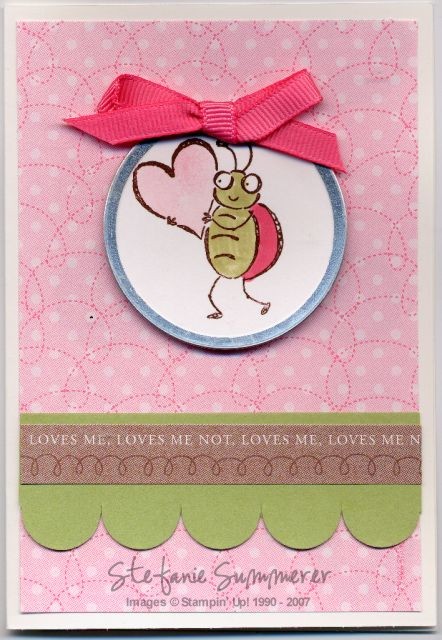 Considering I didn't have a vision in mind for this card, I really love how it turned out. I started with the Note Cards & Small Envelopes from Stampin' Up! These note cards are smaller than the typical 5 1/2" x 4 1/4" card that we normally make. I believe they measure 3 1/2 " x 5".
I also had a bunch of circle aluminium metal edge tags in the larger size left over after making a bunch of these Christmas cards for a swap.
So, I put it all together with some of the Loves Me double-sided Designer paper from the Winter Mini catalog and voila!
Stamps: Olive You
Ink: Stazon Timber Brown, Regal Rose, Certainly Celery & Pretty in Pink Markers
Card stock: Whisper White Small Notes & Envelopes, Certainly Celery, Loves Me Designer paper.
Accessories: Circle Aluminum Metal Edge tags, Rose Grosgrain Ribbon
Tools: Slit Punch, Stampin' Dimensionals
Wednesday, January 17, 2007
Valentine's Treats

Sour cream containers are so fun and easy to make! Courtney has a great tutorial here on her blog.
I must be an odd ball though because I roll mine in the other direction. That makes my containers longer and not as cute. I'll have to try it the other way soon. The only other thing I'll add to Courtney's excellent tutorial is that I crimp the two ends of the container with my Crimper tool. It just adds that little extra finishing touch.
Anyway, I started making them out of vellum card stock after seeing Kelly's cute Halloween treat container on splitcoast stampers. I used Real Red and Basic Black Classic Ink and set them aside to dry for a couple of hours. When I came back they were still wet, so I had to give them a shot with my heat gun. I was planning to make these at a workshop, but I didn't want to bring my heat gun along.

So, I decided to try again with Kraft card stock and whisper white. Which do you like better?
Stamps: So Very, Good Things Simply Sent Kit
Ink: Real Red, Basic Black
Card stock: Vellum Card stock, Whisper White, Kraft
Accessories: Sticky Strip
Tools: Crimper
Tuesday, January 16, 2007
Awning Pocket Note
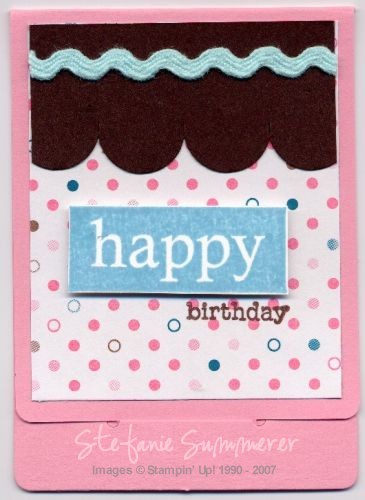
I'm in love with all of the scalloped borders that are so in style right now. Before the holidays I bought several of the Marvy Uchida scalloped punches, but I haven't used them yet. Instead, I've been flipping my Stampin' Up! Slit Punch upside down to make a cute scalloped border. This is all the rage right now on splitcoast stampers, but in case you haven't tried it, here's the quick directions. Hold the punch upside down so you can see where it's going to punch. Then punch across in a straight line so that each slit starts right after the previous one ended. When you've done the entire piece of card stock, the two halves will separate and you'll be left with a scalloped border and a reverse scalloped border. Pretty neat, huh?
In this card, I thought the scalloped border with the Caribbean Cool ric rac looked like an awning to a cute candy shop.
I'm also loving the Loves Me Designer Paper and Flirty Ribbon Originals from the Winter Mini Catalog. They coordinate so well together and the colors are so bright and happy!
Stamps: So Very, Everyday Flexible Phrases
Ink: Taken with Teal, Chocolate Chip
Card stock: Chocolate Chip, Pretty in Pink Pocket Notes, Loves Me Designer Paper
Accessories: Flirty Ribbon Originals
Tools: Paper Snips, Stampin' Dimensionals, Slit Punch
Monday, January 15, 2007
Oh Baby!
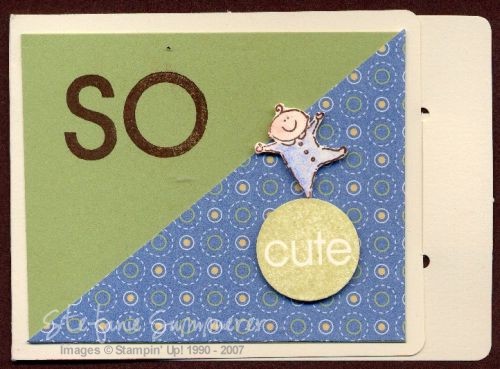
Now that I've pulled out the Pocket Notes from the Winter Mini catalog, I can't stop using them. These little cuties will not be in the Spring Mini catalog so if you like them, you'll want to order them before the end of February.
This card was super easy to make, but it cracks me up. I wanted it to look like the little baby was balancing on the cute ball. I think it came out perfectly.
I only inked the "so" from the So Very Sell-a-Bration set because the whole thing wouldn't fit on my tiny pocket card. The cute ball and baby are popped up with Stampin' Dimensionals.
Stamps: Tag Time, So Very
Ink: Stazon Timber Brown
Card stock: Very Vanilla, Certainly Celery, Very Vanilla Pocket Notes, Sarah Designer Paper
Tools: Paper Snips, Stampin' Dimensionals, Aquapainter, Watercolor Wonder Crayons (Ballet Blue & Blush Blossom)
Sunday, January 14, 2007
Quick Notes
 Yesterday I decided to pull out the pocket notes that I ordered from the Winter Mini Catalog during the preorder period. I guess I just never got around to trying them out before.
This little card was inspired by a swap I received from Lisa Martz. I loved her idea to mount the pocket note onto a full size card. On her card, if you opened the little note, you'd see a secret message.
However, I wanted to keep it simple with these little cards. I think they'd be great for a last minute kids birthday where you don't have a whole lot of time to pull a bigger card together.
Stamps: Cheery Chat, Big Pieces
Ink: Regal Rose, Cool Caribbean, Taken with Teal, Chocolate Chip
Card stock: Whisper White, Taken with Teal, Chocolate Chip Pocket Notes
Accessories: Flirty Ribbon Originals
Tools: Stapler
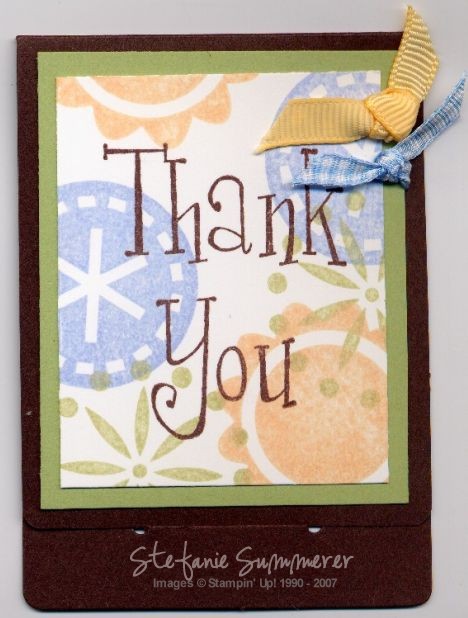
They make cute Thank you notes too. :) In fact, all of the sayings from Cheery Chat fit perfectly on these cute little cards.
Stamps: Cheery Chat, Big Pieces
Ink: Apricot Appeal, Bashful Blue, Certainly Celery, Chocolate Chip
Card stock: Whisper White, Certainly Celery, Chocolate Chip Pocket Notes
Accessories: Apricot Grosgrain Ribbon, Light Blue Gingham Ribbon
Tools: Double Circle Punch
Tuesday, January 09, 2007
Peer Pressure
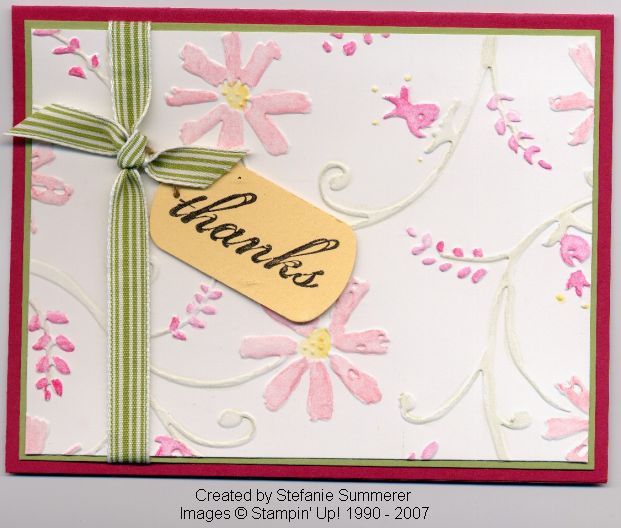
What can I say? I succumbed to peer pressure and am now the happy owner of a super cute little Cuttlebug. The embossing dies sent me right over the edge. I picked up my little green cutie at my local Joann's with a 50% off coupon -- not too shabby!
To make this card, I used the Stylized Flower embossing folder on Whisper White card stock. The machine runs smooth like butter! My only problem is that the screw that holds the handle onto the machine is defective. So until I can call Provo Craft to have it replaced, I am cranking it very carefully. As you can see, it's not slowing me down too much. :)
To color the embossed flowers I used my Aquapainters and Watercolor Wonder Crayons. The colors I used: Cameo Coral, Rose Red, Certainly Celery & Barely Banana are from one of the color combinations on the Color Coach. This is a great tool that really helps you think outside of your normal colored box.
Stamps: Much Appreciated
Ink: Basic Black
Card stock: Whisper White, Certainly Celery, Rose Red
Accessories: Linen Thread, Celery striped ribbon from May Arts
Tools: Label Punch, Watercolor Wonder Crayons, Aquapainter
Wednesday, December 20, 2006
Movie Night

It is so hard to buy presents for grandparents. They usually have everything they need already and might even be downsizing. So this year, we are teaming up with my husband's siblings to give his grandparents a movie night.
I got the tub of microwave popcorn from Blockbuster along with a $10 gift card (enough for 2 movies). Then we picked up some boxed candy at Wal-Mart to round out the offering. I think it came together pretty well.
For the actual movie night, we're planning to have the grandchildren act as ushers and we'll rent some classic movies like Breakfast at Tiffany's or something. I'm not really sure about that part because I was just in charge of the invitation. I had grand plans for this card, but in the end I ran out of time so I did a simplified CASE of Mary Brown's super cute card.
I used the ticket corner punch to make the sentiment resemble a movie ticket.
Stamps: Treat Yourself, Sincere Salutations
Ink: Basic Black, Yoyo Yellow Marker, Real Red Marker
Card stock: Whisper White, Tempting Turquoise, Real Red, Brilliant Blue
Accessories: Ticket Corner Punch, Aquapainter
Happy Holidays to all of you! This will probably be my last post before the new year.
Sunday, December 17, 2006
What Cancer Cannot Do
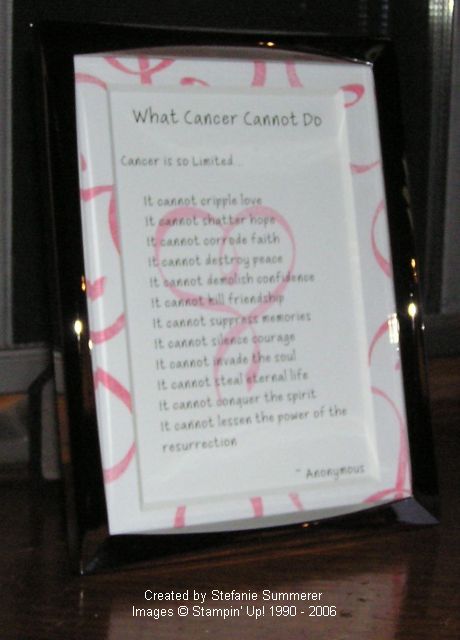 My aunt is going through a rough time with her radiation therapy and I wanted to do something for her to be supportive. I figured if she doesn't like the message in the frame, she can just pop it out and stick her favorite photo inside instead.
 This poem has been floating around the Internet for years. AS far as I know, the author is unknown. I printed the poem on whisper white card stock using the SU Harry Paul font from the Write Me a Memory® Journaling Fonts CD, Volume II. After printing the poem, I stamped the pink ribbon on top with classic ink so that the writing would show through. The mat was embossed with Pretty in Pink craft ink and clear embossing powder. Both the mat and frame are from Target.
Stamps: Hope Is…
Ink: Pretty in Pink craft & classic
Card stock: Whisper White
Accessories: Clear Embossing Powder, Write Me a Memory® Journaling Fonts CD, Volume II
And here is the full poem in case you couldn't read it in the frame:
Cancer is so Limited...
It cannot cripple love
It cannot shatter hope
It cannot corrode faith
It cannot destroy peace
It cannot demolish confidence
It cannot kill friendship
It cannot suppress memories
It cannot silence courage
It cannot invade the soul
It cannot steal eternal life
It cannot conquer the spirit
It cannot lessen the power of the resurrection
~ Anonymous
Wednesday, December 13, 2006
Sporty Frame
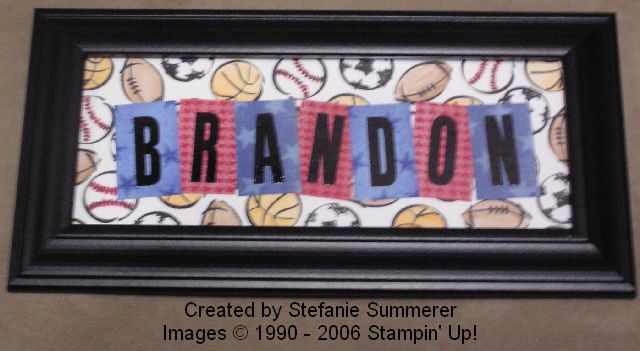 In November, my younger cousin and his girlfriend had a baby. He's 4 years younger than me, so his being a father is a little weird. Anyway, he's always been a big sports fan and the baby's nursery is all decked out with Patriots and Red Sox gear. So, obviously his name frame needed to be a little over the top. I think this fits the bill nicely.
I stamped the baseball, basketball, football and soccer ball from the Good Sport stamp set all over a piece of whisper white card stock to make my own sporty patterned paper. Once again, I used craft ink for everything so that it won't fade over time. To color in the balls, I used an aquapainter and my Watercolor Wonder crayons. I had to use a really light touch with the aquapainter to keep the white card stock from pilling.
Since the background paper is pretty busy, I toned down the letters a little by only using 3 patterns. I love stamping images over the fabric textured background stamps. For this frame, I used the cute little stars from the Starstruck stamp set to tie into my sports theme.
Finally, I embossed the letters themselves in black embossing powder because I found that the white craft ink in the background was bleeding through the black craft ink. Embossing did the trick though and I think it makes the final product look pretty slick.
Stamps:
Ink: Basic Black, Whisper White, Brilliant Blue (all Craft ink)
Card stock: Whisper White,
Accessories: Basic Black Embossing Powder
Just a note, the Good Sport, Houndstooth and Just Jeans stamps are all retired. :(
Monday, December 11, 2006
Time to Sell-A-Brate!

My Sell-A-Bration pre-order came on Friday and I finally sat down to work on my control freaks swap card. It's not exactly what I wanted, but this close to Christmas I think it's as good as it is going to get.
The color combination came from the Color Coach. This is a great tool that I use to break out of my shell and try different color combinations. I think it looks kind of 80s.
As always, when I need a little inspiration I look over the sketch challenges at splitcoast stampers. This time, I used sketch challenge 100. You should definitely give them a try. There's a new one each week!
Stamps:
Ink: Lavender Lace, Basic Black
Cardstock: Whisper White, Basic Black, Lavender Lace, Cameo Coral, Apricot Appeal
Veronika
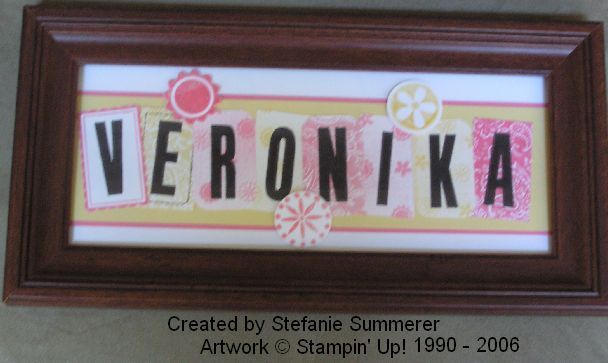
I made this frame for my co-worker's daughter. They are Russian, so the spelling of her name is a little different. That's the great thing about making name frames. Anything goes! It would probably be really hard to find something with her name on it in this country.
I just love the new Big Things stamp set from the winter mini catalog. It coordinates so well with Little Things from the Idea Book & Catalog.
The frame is from Wal-Mart. I used craft ink for everything so it won't fade over time. And for a little extra glitz, I embossed the big things with iridescent ice embossing powder. When I was all done, I thought the E was blending in a little too much, so I used the paper piercer to punch holes all around the edges and then connected them with a black Stampin' Write Journaler to make it look hand stitched.
If you're in my neck of the woods, check out my name frame class in February. I'll do all the cutting and shopping and all you have to do is stamp. The frame is included in my class fee.
Stamps:
Ink: Basic Black, Pretty in Pink, Barely Banana, Regal Rose (all Craft ink)
Cardstock: Whisper White,
Accessories: Iridescent Ice Embossing Powder, Basic Black Stampin' Write Journaler
Thursday, December 07, 2006
More Coaster Info
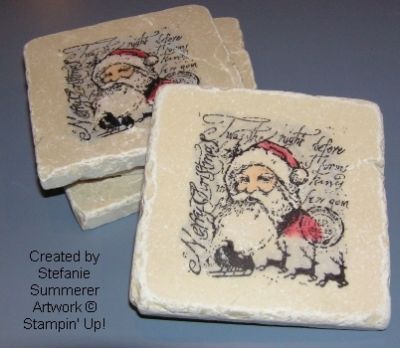 I've received lots of questions about the coasters from yesterday. So I figured I'd address them all in a new post.
I buy my tiles from Lowe's. They are tumbled tiles and come nine to a box. I know it's kind of cheating, but I go through the box in the store to make sure all nine tiles are smooth on top. I figure that the people using the tiles to actually tile a wall won't mind if they get more textured tiles. :)
When you get the tiles home, they will be covered in a chalk like dust. So, you must rinse them off and dry them completely before stamping.
Once dry, stamp away. You can either use solid image stamps with different colors of Stazon or you can you a line stamp with black or brown Stazon. For the Santa, I used Jet Black Stazon. If you aren't planning to color in your tiles, you can stop here. Just set your tiles aside for 48 hours to let the ink cure before using them. I know that some people bake their tiles to set the ink, but I think this is completely unnecessary. Why do extra work?
To color in your images, load a Q-tip up with chalk and then rub in a circular motion on the tile. It's okay if the color is a little lighter than you'd like. Once you seal the tile the color will get brighter and more vibrant.
When you're all done coloring, take the tiles outside and spray two light coats of matte sealant on the tiles. I use Patricia Nimrock Matte Sealant which can be found at Wal-Mart or Michael's. I also let the first coat dry for 15 minutes before applying the second coat.
That's it. Once the second coat dries, your tiles are ready to be used. I've been using one at work for a couple of years now and it looks as good as the day I made it.
Wednesday, December 06, 2006
Tray of Coasters

Well the open house went fairly well on Monday night. I sold a bunch of retired sets and some stuff from the catalog. I did not sell any of these though.
I made six sets of coasters using the retired Yuletide Montage stamp set. I bought this set from my upline after it retired just to make coasters with the Santa. Isn't he perfect?
The tumbled tiles are from Lowe's (I think they have better ones than Home Depot.) I stamped with StazOn, rubbed the chalk onto the tile with a Q-tip and then gave two light coats of Patricia Nimrock Clear Matte Sealant that I bought at Wal-Mart. I'm planning then glued cork to the bottom of each one to protect the furniture.
I guess I'll just pack these away to use as gifts for next Christmas.
Stamps:
Ink: Jet Black Stazon
Monday, December 04, 2006
Simple Snowflakes
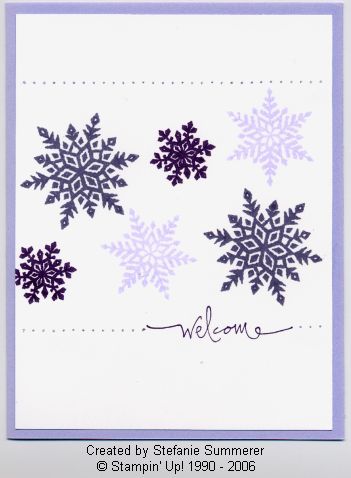
I am part of the welcoming committee for one of my online swap groups -- the Exclusive Swappers. Anyway, I made a bunch of these cards to get ahead for the next round of new members.
I was inspired by this super cute card by jul716 on splitcoast stampers. I used three shades of purple on the snowflakes to add depth. The only embellishment is a line of piercings which was done with the paper piercer and template in the crafter's toolkit.
Stamps:
Ink: Elegant Eggplant, Vintage Violet, Almost Amethyst
Cardstock: Whisper White,
Sunday, December 03, 2006
Holiday Open House
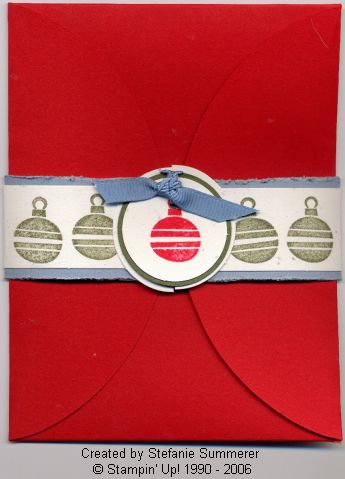

Tomorrow I am representing Stampin' Up! at my neighborhood's holiday open house. This will be the make-n-take for 19 lucky people. (That's all the supplies I have.)
This is a petal card from the die cut petal cards & tags on page 217 of the Idea Book & Catalog. It was super easy to make! The red petal card, and confetti white scalloped rectangle, belly band and 1 1/4 inch circle are all from the die cut sheets. The only thing I added was the bordering blue cardstock and 1 3/8 inch always artichoke circle. I used the new cutter kit to distress the edges of the bordering blue cardstock. I think these would make great party invitations, but for the open house, I just went with a holiday theme.
On the inside, I think there's room to include a wallet size photo or a nice holiday note.
If you're in the neighborhood tomorrow night, stop by! Here's the rest of the scoop.
Stamps:
Ink: Real Red, Always Artichoke
Cardstock: Bordering Blue, Always Artichoke, Bold Brights Petal Cards & Tags
Thursday, November 30, 2006
Odd Combination
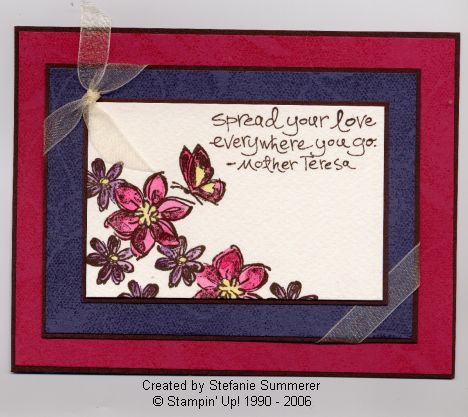
This card didn't turn out the way I was planning at all! In my head, it was pretty in pink and barely banana -- kind of soft and flowy. Somewhere along the way though, it took a surprising turn to rose red and vintage violet -- much more elegant than I envisioned. I'm not really sure where the colors came from. I just pulled them out and gave it a shot. After all, it's just paper right?
The layout is from sketch challenge 84 at splitcoast stampers. I especially loved the way that Trudee used organdy ribbon in her Marigold Petals card here.
This card features another way to use watercolor wonder crayons with watercolor paper. Instead of using the direct to rubber technique that I used for this card, I stamped the flowers and butterfly with Timber Brown Stazon ink on the watercolor paper. Then with my aquapainter, I picked up color from the bottom of my crayons and colored in the images. By using watercolor paper, I had more time to blend colors than I would have with cardstock.
Finally I stamped both the vintage violet and rose red layers with the Fine Lace background stamp to soften the layers.
Stamps:
Ink: Rose Red, Vintage Violet, Timber Brown Stazon
Cardstock:
Tuesday, November 28, 2006
Sweet Thanks
 I am loving the new Loves Me paper in the winter mini. The colors are so me. This card is super simple to make, but uses a bunch of punches.
First I stamped the thank you flower on whisper white cardstock and punched it out with the new small tag punch. Then I punched the regular tag out of regal rose. The horizontal slot punch makes a nice little opening for the taken with teal tab made from the word window punch out. The pretty in pink brad helps tie the whole color scheme together.
This is my favorite layout to showcase tags. I've used it before for this birthday card and originally CASEd it from Jen McCracken whose original card I can't find online anymore but was CASEd here on splitcoast.
Stamps:
Ink: Regal Rose, Cool Caribbean
Cardstock:
Subscribe to:
Posts (Atom)


