Wednesday, December 20, 2006

Movie Night


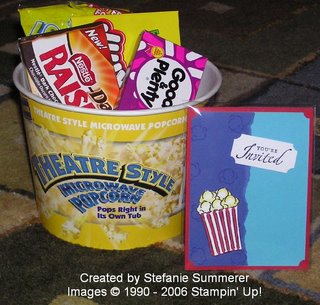
It is so hard to buy presents for grandparents. They usually have everything they need already and might even be downsizing. So this year, we are teaming up with my husband's siblings to give his grandparents a movie night.

I got the tub of microwave popcorn from Blockbuster along with a $10 gift card (enough for 2 movies). Then we picked up some boxed candy at Wal-Mart to round out the offering. I think it came together pretty well.

For the actual movie night, we're planning to have the grandchildren act as ushers and we'll rent some classic movies like Breakfast at Tiffany's or something. I'm not really sure about that part because I was just in charge of the invitation. I had grand plans for this card, but in the end I ran out of time so I did a simplified CASE of Mary Brown's super cute card.

I used the ticket corner punch to make the sentiment resemble a movie ticket.

Stamps: Treat Yourself, Sincere Salutations
Ink: Basic Black, Yoyo Yellow Marker, Real Red Marker
Card stock: Whisper White, Tempting Turquoise, Real Red, Brilliant Blue
Accessories: Ticket Corner Punch, Aquapainter


Happy Holidays to all of you! This will probably be my last post before the new year.

Sunday, December 17, 2006

What Cancer Cannot Do

My aunt is going through a rough time with her radiation therapy and I wanted to do something for her to be supportive. I figured if she doesn't like the message in the frame, she can just pop it out and stick her favorite photo inside instead.

This poem has been floating around the Internet for years. AS far as I know, the author is unknown. I printed the poem on whisper white card stock using the SU Harry Paul font from the Write Me a Memory® Journaling Fonts CD, Volume II. After printing the poem, I stamped the pink ribbon on top with classic ink so that the writing would show through. The mat was embossed with Pretty in Pink craft ink and clear embossing powder. Both the mat and frame are from Target.

Stamps: Hope Is…
Ink: Pretty in Pink craft & classic
Card stock: Whisper White
Accessories: Clear Embossing Powder, Write Me a Memory® Journaling Fonts CD, Volume II

And here is the full poem in case you couldn't read it in the frame:

Cancer is so Limited...

It cannot cripple love
It cannot shatter hope
It cannot corrode faith
It cannot destroy peace
It cannot demolish confidence
It cannot kill friendship
It cannot suppress memories
It cannot silence courage
It cannot invade the soul
It cannot steal eternal life
It cannot conquer the spirit
It cannot lessen the power of the resurrection

~ Anonymous

Wednesday, December 13, 2006

Sporty Frame

In November, my younger cousin and his girlfriend had a baby. He's 4 years younger than me, so his being a father is a little weird. Anyway, he's always been a big sports fan and the baby's nursery is all decked out with Patriots and Red Sox gear. So, obviously his name frame needed to be a little over the top. I think this fits the bill nicely.

I stamped the baseball, basketball, football and soccer ball from the Good Sport stamp set all over a piece of whisper white card stock to make my own sporty patterned paper. Once again, I used craft ink for everything so that it won't fade over time. To color in the balls, I used an aquapainter and my Watercolor Wonder crayons. I had to use a really light touch with the aquapainter to keep the white card stock from pilling.

Since the background paper is pretty busy, I toned down the letters a little by only using 3 patterns. I love stamping images over the fabric textured background stamps. For this frame, I used the cute little stars from the Starstruck stamp set to tie into my sports theme.

Finally, I embossed the letters themselves in black embossing powder because I found that the white craft ink in the background was bleeding through the black craft ink. Embossing did the trick though and I think it makes the final product look pretty slick.

Stamps: Headline Alphabet, Good Sport, Just Jeans, Houndstooth, Canvas, Starstruck
Ink: Basic Black, Whisper White, Brilliant Blue (all Craft ink)
Card stock: Whisper White,
Brilliant Blue, Real Red, Bashful Blue
Accessories: Basic Black Embossing Powder
Tools: Snail Adhesive, Heat Tool, Powder Pal, Aquapainter

Just a note, the Good Sport, Houndstooth and Just Jeans stamps are all retired. :(

Monday, December 11, 2006

Time to Sell-A-Brate!


My Sell-A-Bration pre-order came on Friday and I finally sat down to work on my control freaks swap card. It's not exactly what I wanted, but this close to Christmas I think it's as good as it is going to get.

The color combination came from the Color Coach. This is a great tool that I use to break out of my shell and try different color combinations. I think it looks kind of 80s.

As always, when I need a little inspiration I look over the sketch challenges at splitcoast stampers. This time, I used sketch challenge 100. You should definitely give them a try. There's a new one each week!

Stamps: So Very, Happy Hearts, All in a Row
Ink: Lavender Lace, Basic Black
Cardstock: Whisper White, Basic Black, Lavender Lace, Cameo Coral, Apricot Appeal
Accessories: Black Grosgrain Ribbon, Mini Glue Dots, Snail Adhesive

Veronika


I made this frame for my co-worker's daughter. They are Russian, so the spelling of her name is a little different. That's the great thing about making name frames. Anything goes! It would probably be really hard to find something with her name on it in this country.

I just love the new Big Things stamp set from the winter mini catalog. It coordinates so well with Little Things from the Idea Book & Catalog.

The frame is from Wal-Mart. I used craft ink for everything so it won't fade over time. And for a little extra glitz, I embossed the big things with iridescent ice embossing powder. When I was all done, I thought the E was blending in a little too much, so I used the paper piercer to punch holes all around the edges and then connected them with a black Stampin' Write Journaler to make it look hand stitched.

If you're in my neck of the woods, check out my name frame class in February. I'll do all the cutting and shopping and all you have to do is stamp. The frame is included in my class fee.

Stamps: Headline Alphabet, Big Pieces, Little Things, Label Classics, Paisley, Linen, Canvas
Ink: Basic Black, Pretty in Pink, Barely Banana, Regal Rose (all Craft ink)
Cardstock: Whisper White,
Barely Banana, Regal Rose
Accessories: Iridescent Ice Embossing Powder, Basic Black Stampin' Write Journaler
Tools: Crafter's Toolkit, Snail Adhesive, Heat Tool, Powder Pal

Thursday, December 07, 2006

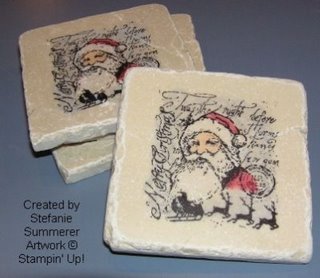
More Coaster Info

I've received lots of questions about the coasters from yesterday. So I figured I'd address them all in a new post.

I buy my tiles from Lowe's. They are tumbled tiles and come nine to a box. I know it's kind of cheating, but I go through the box in the store to make sure all nine tiles are smooth on top. I figure that the people using the tiles to actually tile a wall won't mind if they get more textured tiles. :)

When you get the tiles home, they will be covered in a chalk like dust. So, you must rinse them off and dry them completely before stamping.

Once dry, stamp away. You can either use solid image stamps with different colors of Stazon or you can you a line stamp with black or brown Stazon. For the Santa, I used Jet Black Stazon. If you aren't planning to color in your tiles, you can stop here. Just set your tiles aside for 48 hours to let the ink cure before using them. I know that some people bake their tiles to set the ink, but I think this is completely unnecessary. Why do extra work?

To color in your images, load a Q-tip up with chalk and then rub in a circular motion on the tile. It's okay if the color is a little lighter than you'd like. Once you seal the tile the color will get brighter and more vibrant.

When you're all done coloring, take the tiles outside and spray two light coats of matte sealant on the tiles. I use Patricia Nimrock Matte Sealant which can be found at Wal-Mart or Michael's. I also let the first coat dry for 15 minutes before applying the second coat.

That's it. Once the second coat dries, your tiles are ready to be used. I've been using one at work for a couple of years now and it looks as good as the day I made it.

Wednesday, December 06, 2006

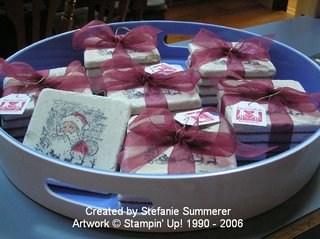
Tray of Coasters


Well the open house went fairly well on Monday night. I sold a bunch of retired sets and some stuff from the catalog. I did not sell any of these though.

I made six sets of coasters using the retired Yuletide Montage stamp set. I bought this set from my upline after it retired just to make coasters with the Santa. Isn't he perfect?

The tumbled tiles are from Lowe's (I think they have better ones than Home Depot.) I stamped with StazOn, rubbed the chalk onto the tile with a Q-tip and then gave two light coats of Patricia Nimrock Clear Matte Sealant that I bought at Wal-Mart. I'm planning then glued cork to the bottom of each one to protect the furniture.

I guess I'll just pack these away to use as gifts for next Christmas.

Stamps: Yuletide Montage
Ink: Jet Black Stazon
Accessories: Stampin' Pastels

Monday, December 04, 2006

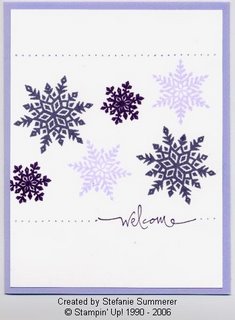
Simple Snowflakes


I am part of the welcoming committee for one of my online swap groups -- the Exclusive Swappers. Anyway, I made a bunch of these cards to get ahead for the next round of new members.

I was inspired by this super cute card by jul716 on splitcoast stampers. I used three shades of purple on the snowflakes to add depth. The only embellishment is a line of piercings which was done with the paper piercer and template in the crafter's toolkit.


Stamps: Snowflakes, Warm Words
Ink: Elegant Eggplant, Vintage Violet, Almost Amethyst
Cardstock: Whisper White,
Almost Amethyst
Accessories: Crafter's Toolkit, Snail Adhesive

Sunday, December 03, 2006

Holiday Open House


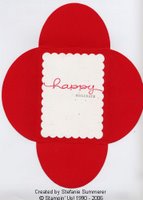
Tomorrow I am representing Stampin' Up! at my neighborhood's holiday open house. This will be the make-n-take for 19 lucky people. (That's all the supplies I have.)

This is a petal card from the die cut petal cards & tags on page 217 of the Idea Book & Catalog. It was super easy to make! The red petal card, and confetti white scalloped rectangle, belly band and 1 1/4 inch circle are all from the die cut sheets. The only thing I added was the bordering blue cardstock and 1 3/8 inch always artichoke circle. I used the new cutter kit to distress the edges of the bordering blue cardstock. I think these would make great party invitations, but for the open house, I just went with a holiday theme.

On the inside, I think there's room to include a wallet size photo or a nice holiday note.

If you're in the neighborhood tomorrow night, stop by! Here's the rest of the scoop.

Stamps: Hung up on the Holidays, Happy Everything
Ink: Real Red, Always Artichoke
Cardstock: Bordering Blue, Always Artichoke, Bold Brights Petal Cards & Tags
Accessories: French Blue Grosgrain Ribbon, 1 1/4" circle punch, 1/8" circle punch, Cutter Kit, Snail Adhesive